A beginner’s guide to photographing a moonrise

Back in July I was on the hill opposite Abbotsbury’s St Catherine’s Chapel in Dorset, watching the full Buck moon lift into a hazy blue sky. The chapel is already a strong subject, but add the moon rising behind it and the scene suddenly feels much more magical. This guide is about how you can plan and shoot something similar, even if you don't have a 600mm telephoto lens that was used for the shot above.
1. Start with an idea, then plan it
Begin by deciding what you’d like the moon to rise over: a church on a hill, a clump of trees, a Dartmoor tor, or anything that stands clearly against the sky. St Catherine’s Chapel is perfect for this because it sits on an isolated hilltop high above Abbotsbury and is visible for miles around.
Once you’ve chosen your subject, you need to know three things:
When the moon will rise.
From which direction it will appear on the horizon, relative to your chosen landmark
Where to stand so that the moon rises in line with the landmark, and the moon appears the size you're trying to achieve (the stronger the telephoto lens, the larger the moon will look and the further away from the landmark you will need to stand).
This is where The Photographer’s Ephemeris (TPE) comes in. TPE is a map‑based planner app (available on iPhones and Android phones) that shows you sun and moon rise and set times and, crucially, the exact direction they will rise or set from any point you choose on the map. On the app, select 'Planner'
2. Using The Photographers Ephemeris to identify where the moon will rise and where you need to stand
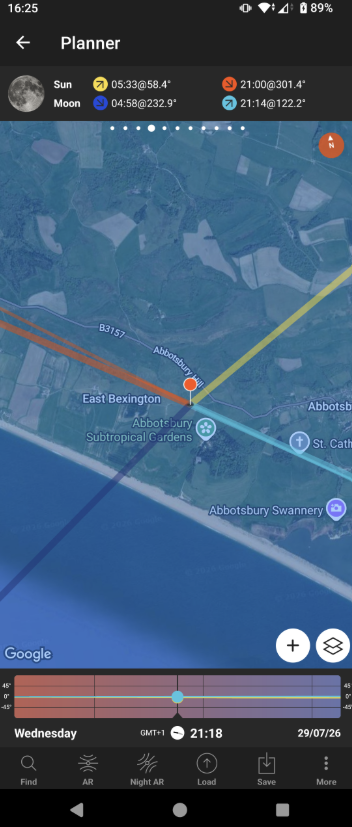
In the TPE screenshot below, you’ll see the chapel marked with the cross symbol, and four coloured lines radiating from it. These show the directions of sunrise, sunset, moonrise and moonset for the chosen date and time. The yellow line marks the direction of sunrise, the orange line marks the direction of sunset, the light blue line marks the direction of moonrise, and the dark blue line marks the direction of moonset. I’ve moved the time slider to 21:18 on 29 July, which is around the moment the moon was due to rise for this shot. At that time the moon is just coming up, so its current position (marked by another light blue line) sits directly on the light blue moonrise line (you can just about make out the two lines overlapping). Setting the exact date and time is important, because the angle of the moonrise line shifts slightly from night to night.
At 21:18, that light blue moonrise line runs out from the chapel towards the west. You can think of it as the “track” the moon will follow as it appears over the horizon. By following it across the map you can see where it crosses roads, paths or open ground. Any point on that line is a place where, in theory, you could stand and see the moon rising in line with the chapel. In the screenshot you can see that I’ve placed a red pin at the position on a minor road where that line crosses. This means that if I stand at the red pin at 21:18, the moon should rise in line with the chapel as seen from that point.
I then used Google Maps’ measuring tool to check the distance from the red pin back to the chapel. It turned out to be about 1.2km, which is a very comfortable working distance for a 600mm zoom lens if you want the moon to appear large in the frame while still keeping the chapel and landscape in view.
So, this is exactly how I use TPE in practice – not just to find out when and where the moon will rise in relation to my chosen landmark, but to sketch out where I might physically stand to get the alignment I’m after.
3. Refining the plan with Google Street View
My next step was to try Google’s Street View to check whether the chapel would actually be visible from that part of the lane – in other words, to see if there were big hedges, trees or dips in the road that might block the view. Street View is a quick way to confirm that the nice clear line on the planner map matches a real‑world line of sight. In this case, though, Street View stopped at the top of the lane; looking down it, the view towards the chapel looked promising, but I couldn’t see the detail at the exact spot I’d identified to stand. So in the end I had to take a bit of a risk and trust the map, then fine‑tune my position on the ground when I arrived (more on how that played out later in the article).
4. When the map is right but reality isn’t
On the map the location appeared perfect – the moonrise line ran right through the road I had identified – but without Google Street View coverage there was no way to “pre‑walk” it virtually and check for hedges and dips.
When I arrived, I discovered that a deep dip in the road and taller hedges meant that if I stood exactly where the pin was, I couldn't see the chapel. So, I ended up in a gateway about 20 metres away from the ideal position with a clear view to the chapel. However, that 20m was enough to change the alignment so that the moon would not rise exactly behind the chapel in the way I had hoped. Close, but no cigar!
The lesson here, is that TPE gets you very close, but the last few metres depend on what the ground actually does. If Street View isn’t available, build in extra time to walk your intended position, try a few positions near the mapped line, and accept that you may need to compromise between perfect alignment and actually being able to see your subject.
5. Kit and settings: a simple starting point
Because I couldn’t check the exact view on Street View, I arrived at the lane in good time before moonrise. That gave me chance to walk up and down the road, find the best spot that actually gave a clear view of the chapel, set up the tripod and then simply wait for the moon to appear.
For this kind of work a tripod is essential. You’re usually shooting around sunset or into the blue hour, and you want a steady platform for longer focal lengths and slower shutter speeds. A remote release or using the self‑timer helps reduce the risk of wobble further, especially with a heavier 600mm lens.
On the Abbotsbury evening the light was fading, so I settled on:
Aperture: f/6.3 – enough depth of field to keep chapel and moon acceptably sharp, without forcing the ISO too high.
Shutter speed: around 1/40s – just about fast enough to minimise the risk of small movement from wind or lens shake on the tripod, whilst also keeping the ISO manageable. I would have liked t go faster as a 600mm lens on a tripod on full zoom can be a little unstable, but I didn't want to push the ISO too high.
ISO: roughly 1000-1600 and sometimes higher as the sky darkened, to hold good exposure on both foreground and sky.
These aren’t fixed rules, just a realistic starting point for a rising full moon around sunset. The important thing to remember is that the moon is much brighter than the landscape; if you expose purely for the fields and chapel, the moon will tend to blow out to a featureless white disc.
On this night there was also a band of haze sitting on the horizon. So, despite what the the TPE planner said, at “moonrise time” nothing seemed to happen – the moon was hidden in the murk. Eventually it did lift above the haze, and I captured a frame where it’s just appearing as a soft, pink disc above the horizon (see photo below). As you can see, it's not directly in line with the chapel because I couldn't stand in exactly the right place! From that point on I kept shooting, trying different compositions and shifting a little along the road (avoiding the dip where the chapel wasn't visible!) to see how the balance of composition between chapel and moon changed.

6. Bracketing to keep detail in the moon
To cope with the bright moon and darker foreground, exposure bracketing is very helpful. In practice this means taking a sequence of frames at different exposures:
One frame exposed a little darker to preserve detail and texture in the moon.
One frame exposed a little brighter to lift the shadows in the landscape.
Optionally, a middle exposure as a safety net.
Later, you can blend the best parts together in post‑processing, giving a final image where the moon retains its craters and edge detail, and the chapel and fields don’t sink into silhouette. Even if you don’t composite, bracketing gives you a choice of exposures so you’re not relying on a single “perfect” frame.
See my guide to bracketing here.
7. Making it work with modest kit
If your longest lens isn’t a 600mm super telephoto like mine, the process is still exactly the same – you just adjust how far you stand from the landmark to suit your focal length, and accept that the moon will look smaller in the frame.
As a rough guide:
With a 300–400mm lens, try being in the region of 800–1000 metres from your subject.
With a 200–250mm lens, something like 400–600 metres away often works well.
With a 100–135mm lens, you’ll probably be closer again, around 200–300 metres from the subject, treating the moon as a smaller but still important element in a wider landscape.
These are only ballpark figures, but they give you a starting point when you’re dragging the pin along that moonrise line in the planner. The closer you are, the smaller the moon appears relative to the building; the further back you go, the larger the moon looks and the tighter the composition becomes. The key is to match your distance to whatever your longest focal length is, then build a simple, uncluttered composition around that.
Landscape Photography for Beginners - now as a pdf download!
You may already be aware that in 2025, my Landscape Photography for Beginners book was released on Amazon as a paperback. It has been a lovely way to share what I’ve learned in the field over the last 20 years, but I know a lot of you prefer to read on a tablet or laptop rather than adding another book to the shelf. Thanks to Amazon taking most of the sale price, the paperback edition is also sadly quite expensive.
So, I’ve now created a digital edition that you can download directly from my website. It’s the same content as the print version, presented as a high‑quality, screen‑friendly PDF with full‑colour images and double‑page photo spreads kept intact. The e-book is designed to take you from “point and hope” to taking deliberate, confident landscape photos, with clear explanations, simple settings that actually matter, and plenty of examples from real locations. If you’d like a copy, you’ll find it in the shop section of my site HERE, ready to download and keep as a reference for your next outing.

About Gary Holpin Photography
As a professional photographer based in Devon, my journey began along the stunning South West Coast Path. Disappointed with my initial attempts to capture its beauty, I embarked on a second 630-mile journey, this time dedicated to mastering photography. Today, I'm a nationally acclaimed photographer with award-winning landscape photos.
I specialize in providing top-notch property photography, business photography, and drone photography services to businesses across the South West. Additionally, I offer comprehensive photography training courses tailored for both businesses and individuals. Whether you're looking to enhance your corporate image or improve your personal photography skills, my training programs are designed to help you capture stunning images.
As an award-winning and widely published photographer, I frequently share my passion for photography and Devon through engaging talks at local camera clubs and community groups. My expertise spans the entire South West region, ensuring that clients from Devon, Dorset & Somerset benefit from high-quality photography services and training.