
Six Steps to Fantastic Firework Photography
- Gary Holpin
- Dec 18, 2025
- 6 min read
Although I've covered the topic before in my blogs, having been to a display recently, it's fresh in my mind and so I thought I would cover it again with my latest perspectives on the best techniques.
Introduction
Capturing fireworks can be one of the most rewarding challenges in photography. The combination of light, colour, and timing makes for spectacular images, but it also demands careful preparation and a good understanding of exposure. In this post, we’ll look at how to plan your shoot, choose the right camera settings, and compose those fleeting bursts of light so they translate beautifully into still photos.
Step 1: Planning
The key to successful firework photography is preparation long before the display begins. Start by finding out exactly where and when displays will be held, and start considering your chosen location, especially places to view it from and options for foreground interest. A useful tip is to look at previous photos of the event online — to get a sense of popular vantage points and how the display interacts with its surroundings. This helps you identify promising locations for both technical and creative reasons.
Foreground matters: interesting elements like reflections in water or distinctive silhouettes can transform a basic firework shot into something memorable. Displays beside water can add reflections of the fireworks as foreground, and displays in built up areas can add visual interest. Some of the least interesting are the displays in a field in the middle of nowhere, but even there you can use the excited crowd are foreground if necessary.
Weather is also critical — rain can make shooting whilst keeping your camera dry and lens free of spots very difficult.
Arrive early to avoid the crowds - public displays are often popular and you may need to walk some distance from available parking. It's also much easier to scout a location to find a good place to stand well before the crowds arrive and take the best spots!
Step 2: Have the Right Kit
Tripod
A sturdy tripod is absolutely essential for firework photography, as you’ll be using long exposures and any movement can ruin your shot. Make sure yours is reliable, lightweight enough to carry, and allows you to set up quickly in crowded spaces.
Remote Release
To avoid camera shake when triggering the shutter, you’ll want some way to operate the camera remotely. Options include a cable release, a dedicated infrared or Bluetooth remote, or a compatible camera app for your smartphone—any will work, but whatever you choose, make sure it’s paired and functioning before you get to the venue. This simple check can save a lot of hassle in the dark or when the action starts.
Torch
Don’t overlook a small torch, either. Firework displays obviously happen at night and you’ll need to see your controls, adjust your tripod, or find accessories in your bag—all best done with added light. A head torch with a red light is particularly useful, as it allows you to keep both hands free and preserves your night vision.
Lens choice
It’s important to choose a lens that captures the full height of the fireworks—these displays often go higher than you’d expect. Reviewing previous photos of the same event can give some idea, but shooting wider than you think is usually the safest strategy since you can always crop in later if needed. An ultra-wide lens in the 14-24mm range is usually ideal for this purpose, giving plenty of space for both the fireworks and any interesting foreground elements like reflections or silhouettes.
Mounting the camera vertically helps make the most of the available height and ensures all the bursts fit into your composition. Whatever lens you choose, make sure it’s clean and check its operation before heading out for trouble-free shooting in the dark.
Step 3: Composition
As with any sort of photo, composition is critical and effort here pays off with memorable shots. Begin by looking for interesting foreground elements—to add context, scale, and interest to your photos. Hopefully you will have already identified these in step 1, either before you got to the location or during a scout when you first arrive.
Using the rule of thirds is a tried-and-tested way to place the fireworks origin off-centre, often in the lower third, so you capture full trails along with foreground interest. Vertical orientation normally works best and ensures you can capture the full height of the fireworks, but if you are shooting from a distance, horizontal could also work.
Leave plenty of space at the top of your frame before the show starts—fireworks often shoot far higher than anticipated. Watch a few bursts at the beginning to refine your composition, then adjust as needed. Negative space can be powerful, so don’t feel you have to fill the frame with colour. Simpler compositions, where fireworks occupy just a section of the image against a dark sky, often have more impact
Step 4: The Right Settings
Selecting the correct camera settings is essential for sharp, vibrant firework photographs. You'll want to be shooting on Manual modem and for aperture, aim for a mid-range setting—f/8 to f/11. This ensures good sharpness and plenty of depth of field for both fireworks and any foreground you’ve included.
Shutter speed is the key to dynamic images. Using an exposure of around 8-10 seconds means you’ll often catch multiple bursts in one frame, making for much more interesting and layered shots. You may need to experiment with timings to suit the pace of your particular display, but longer exposures generally work best. Another option is to set your camera to BULB mode so that you can open and close the shutter exactly when you want, based on what's happening with the display (although note that if the time is much shorter or longer, this can result in under / over exposed images so I tend to stick to a fixed shutter speed so you know the exposure will be about right in every shot).
ISO is where many beginners get tripped up. Don’t set for a perfectly balanced exposure (light meter at zero) before the display begins—once the fireworks start, the scene will be much brighter and risks severe over-exposure. Instead, set your ISO low (ISO 100-200) and adjust so that any fixed bright lights (such as streetlights) aren’t blown out. This will usually bring your exposure closer to ideal for the bursts themselves. Check your first few shots and tweak as needed, but exposure should favour preserving highlight detail in the fireworks.
Step 5:Focus & Lock
For the sharpest results, start by focusing on a bright light in your scene—like a street lamp or illuminated building—using autofocus which will work well as long as you can find a high contrast area (e.g. a light surrounded by dark). Once you have crisp focus on that point, switch your lens or camera over to manual focus so that the setting remains fixed for the whole display, even as you operate the remote release. This ensures your camera won’t refocus or hunt for focus with each shot, keeping your images consistently sharp throughout the event. Take a couple of test exposures before the fireworks start to check sharpness, then leave the focus untouched unless you recompose or change lens.
Now you're ready for the display to begin!
Step 6: Timing is Key
Great firework photos come down to precise timing—success is less about luck than anticipating each burst and being ready to capture the moment. As soon as you hear the first firework launch, open the shutter. Your longer shutter (e.g. 8 seconds) should then capture a whole sequence of 2-3 fireworks. It's usually better to do this with rockets, rather than the low level fireworks, as the former tend to produce more interesting photos.
After a couple of sequences, check your exposure, reducing the ISO if the fireworks look over exposed, or increasing if they look under exposed. Also re-compose or zoom out if you feel the fireworks are exploding too close to the edge or top of the frame. You can also increase the shutter speed if you want to include more firework bursts in each photo, but make sure you adjust your ISO accordingly so you don't over expose.
Last of all, don't forget to enjoy the display, and hopefully you will have some great photos to remember the event!
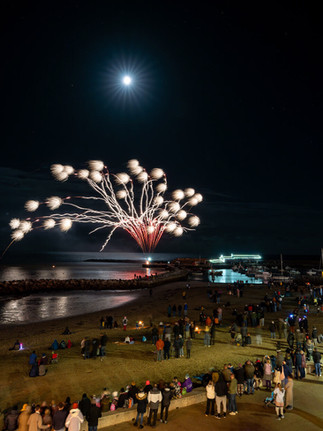
The Results
Below are a set of photos from Lyme Regis firework display back in November, where I used exactly the process outlined above.


Want some help improving your photography skills?
Don't forget that if you want some direct help with your photography, I offer a range of 1-2-1 photography courses for Devon based folks. If you're not nearby then I also offer residential workshops for beginner photographers or improving photographers.

About Gary Holpin Photography
As a professional photographer based in Devon, my journey began along the stunning South West Coast Path. Disappointed with my initial attempts to capture its beauty, I embarked on a second 630-mile journey, this time dedicated to mastering photography. Today, I'm a nationally acclaimed photographer with award-winning landscape photos.
I specialize in providing top-notch property photography, business photography, and drone photography services to businesses across the South West. Additionally, I offer comprehensive photography training courses tailored for both businesses and individuals. Whether you're looking to enhance your corporate image or improve your personal photography skills, my training programs are designed to help you capture stunning images.
As an award-winning and widely published photographer, I frequently share my passion for photography and Devon through engaging talks at local camera clubs and community groups. My expertise spans the entire South West region, ensuring that clients from Devon, Dorset & Somerset benefit from high-quality photography services and training.
